How to Create Versatile npm Packages
Introduction and Disclaimer
When you experience the misery of being a JavaScript developer for long enough, you might have the bright idea of contributing to the npm ecosystem by creating your own game changing npm package. You enter tutorial quicksand and then you realize - “this is way too complicated.”
It’s true, there’s a lot of information online about creating npm packages; much of it conflicting. But fear not. I have reached enlightenment and will share what I have learned.
This guide consists of three sections:
-
An overview of terminology for JavaScript and its module systems (e.g., ECMA, CJS, ESM, etc.).
Note: section 1 has been separated to an independent article found here that also highlights the history of JavaScript. I highly recommend reading my previous article to fully understand the terminology used in this article.
-
A walkthrough to set up a development environment configured with type safety, code formatting, dependency management, unit testing, and automatic releases.
-
An opinionated recipe for making scalable npm packages that have wide support for users by delivering the most common JavaScript module systems, CommonJS and ES Modules.
While there is no “one size fits all” solution, this guide will present topics that should be considered when authoring an npm package, as well as provide justifications for tech/design decisions I’ve made to help give you informed opinions on how to make your next Game Changing Million Dollar npm Package (GCMDNP).
Follow along with my npm starter-kit repo.
Note: see pull requests and issues for more details on my workflow.
JavaScript Version and CommonJS vs ES Module
When we make JavaScript packages we must consider the JavaScript version and module systems we ship to users. Yeah, that’s right - not all JavaScript is the same.
The JavaScript version provides the syntax and APIs you and your users can use. The module system determines how your code is imported/exported and which users can use your package.
IMPORTANT
This article assumes that you understand the different JavaScript version and module system terminology. Understanding the terminology detailed in my previous article is a prerequisite to fully understand the contents of this article.
If hearing that “not all JavaScript is the same” is a surprise to you, or if you’re just interested in reading about the history of JavaScript, please see my previous article here: eyas.ca/blog/clarifying-javascript-terminology-and-history/
JavaScript Versions
Below are excerpts from my previous article. See more here.
The “JavaScript version” is often referred to by the ECMA-262 edition, the ECMAScript version, the ECMAScript year, or the JavaScript version.
Keep in mind which JavaScript version you use and ship to your users:
| ECMA-262 | ECMAScript edition | ECMAScript year | JavaScript (ES compliant) |
|---|---|---|---|
| Edition 1 | ES1 | ES1997 | JavaScript 1.3 |
| Edition 2 | ES2 | ES1998 | JavaScript 1.3 |
| Edition 3 | ES3 | ES1999 | JavaScript 1.5 |
| Edition 4 | ES4 | (cancelled version) | not completed |
| Edition 5 | ES5 | ES2009 | JavaScript 1.8.5 |
| Edition 6 | ES6 | ES2015 | |
| Edition 7 | ES7 | ES2016 | |
| Edition 8 | ES8 | ES2017 | |
| Edition 9 | ES9 | ES2018 | |
| Edition 10 | ES10 | ES2019 | |
| Edition 11 | ES11 | ES2020 | |
| Edition 12 | ES12 | ES2021 | |
| Edition 13 | ES13 | ES2022 | |
| Edition 14 | ES14 | ES2023 | |
| Upcoming version | ESNext |
JavaScript Module Systems
Below are excerpts from my previous article. See more here.
“Should we author npm packages that support CommonJS module users?”
In a GitHub issue with no consensus, core Node.js contributor James M. Snell writes in March 2021 that CommonJS is not widely adopted but is also not close to being deprecated in Node.js.
Given CommonJS will be available as a module system for the foreseeable future, we should support those who choose to develop in CommonJS as well as the soldiers left behind in tech dept.
This guide will show you an easy method to deliver CommonJS to your users.
“Should we author npm packages that support ES Module users?”
In short, yes. Whether you like ES Modules or not, runtimes will support the ES Module implementation for the foreseeable future. We should support developers who choose to develop in ES Modules.
This guide will show you an easy method to deliver ES Modules to your users.
Using CommonJS and ES Modules
Your code will be determined as either CommonJS or ES Module by your runtime environment using the following methods (sorted by priority):
CommonJS
- acceptable file extensions:
.js,.cjs package.jsonattribute:"type":"commonjs"- an empty
"type"attribute defaults to"commonjs"
- an empty
- the module import/export methods described here
ES Module
- acceptable file extensions:
.js,.mjs package.jsonattribute:"type":"module"- the module import/export methods described here
Tree Shaking
Tree Shaking refers to the bundler removing unused/dead code from the final build. This doesn’t apply to this package directly, but it does apply for any user that would consume this package. I.e., if a user only wants to use a portion of the package, the unused code should be removed rather than waste space by being bundled in their project. Therefore the package should be written in a way that can be easily tree shaken.
The CommonJS problem
You might find that online resources make conflicting claims:
- Commonly, “Tree Shaking is only possible with ES Modules” or “It relies on the static structure of ES2015 module syntax”
- Far less common, “Tree Shaking is sometimes possible with CommonJS”
The reason Tree Shaking is commonly associated with ES Modules is because the algorithm used to strip unused/dead code from the project will perform static analysis to determine which code is used or declared in the global scope at the time of bundling.
This is almost impossible to determine in CommonJS because one of CommonJS’ distinguishing features is the ability to conditionally import. E.g.,
1if (condition) {2 const pkg = require("./index")3}In the example above, whether ./index is imported is determined at runtime, so an algorithm can’t determine whether the import will ever resolve and will therefore bundle ./index just in case. This is the reason that some bundlers don’t even attempt to tree shake CommonJS and therefore ./index will be bundled just in case even if it isn’t conditionally imported.
How to defy god
There are usually plugins for modern bundlers that will perform advanced static analysis to remove unused/dead CommonJS code. You’ll have to do research on solutions that work for you and rely on open-source maintainers. For example Webpack’s webpack-common-shake.
This project will supply an import subpath (discussed later) that will allow users to narrow what they import regardless of whether unused/dead code has been tree shaken.
Writing Tree Shakable Code
I recommend reading Simohamed Marhraoui’s article at LogRocket, “Tree shaking and code splitting in webpack”. The article extensively explains how to optimize your code for tree shaking when using things like classes, namespaces, side effects, etc.
Some good rules of thumb for tree shaking are as follows:
-
Use named exports when exporting code (discussed further here).
-
Do not bundle code into one file (discussed further here).
-
Do not write code with side effects.
A side effect is code that performs something other than exposing exports. An example of a common side effect is adding a polyfill to your code, or any other impure code.
foo.js 1console.log('hello') // <- side effect!23export const foo = () => {4console.log('world')5}bar.js 1import { foo } from './foo.js'23// `console.log('hello')` will execute even though only `foo` was imported, which means there's a side effect!It’s best to add the following attribute to the
package.jsonconfiguration when the package doesn’t contain a side effect:package.json {// some config"sideEffects": false} -
Export the package with a wildcard subpath entry point.
Subpath entry points make it possible for the user of the package to make a relative import to the exact module they need within the package. This lets users take advantage of tree shaking as well as dynamic importing to perform lazy-loading (aka code-splitting). Christian Gonzalez writes an insightful article describing how subpath imports fix tree shaking in circumstances where code doesn’t tree shake correctly.
Export pattern

When exporting functions, variables, classes, etc. use the patterns:
1export const hello = "world"2
3// OR4
5const hello = "world"6export {  hello  }
The main reasons to avoid the default pattern are:
-
exporting as
defaultexports as value rather than a live reference- this could have unexpected behaviours, specifically if your module has side effects or is exporting
const/letscoped anonymous functions (that won’t be hoisted).
- this could have unexpected behaviours, specifically if your module has side effects or is exporting
-
transpilers could have unexpected behaviors and create patterns such as1:
file1.js 1function hello () { return "hello" }2export default hellofile2.js 1import hello from ('./file1.js')23hello.default() -
tooling is better for named exports because autocomplete can tell which package you’re importing based on the destructured element.
-
it’s easier for compilers to statically analyze which code is unused for tree shaking.
-
Most importantly, the people who use your package are going to spit in your oatmeal.2
Use index files as your entry point (barrel files)
Node.js has a special relationship with index files. You’ll notice in the example code that I do a trick where imports don’t define the specific file, but rather only specify the file directory to be imported:
1export const hello = "hello"1import { hello } from "./lib" // <- notice I didn't need to reference "./lib/index"This is possible because this project will use TSConfig’s bundler module resolution which will perform directory module resolution from the CommonJS module system (even though the import statement is ESM syntax) to specifically look for index.js or index.node in the case where a directory path is supplied as an import rather than a file path.
Congratulations!!
Time to build the package!
Setting up your environment

Note: This guide will assume you have Node.js and npm set up on your system
GitHub
Initialize your git repo on GitHub. I prefer creating a repo on GitHub and connecting via the https address, but another common method is to clone the repo.
-
Initialize a repo using the https address with the following command:
Terminal window mkdir <REPO_NAME> && cd <REPO_NAME> \git init -b main \git add . && git commit --allow-empty -m "initial commit" \git remote add origin <HTTP ADDRESS> \git push -u origin main -
If they don’t exist already, use the following command to create a
.gitignore,README.mdand aCONTRIBUTING.md:Terminal window echo "# My Game Changing Million Dollar NPM Package" > README.md \echo node_modules > .gitignore \touch CONTRIBUTING.md \git add . && git commit -m "docs: add gitignore, CONTRIBUTING, and README"The
CONTRIBUTING.mddocument should be the guidelines for how you and others should create commit messages and pull requests. Examples of contributing files:The
README.mddocument will be the landing page for the package on the npm website. It’s standard to format theREADME.mdwith the following sections:Terminal window # <TITLE>## Summary<PACKAGE SUMMARY>## Installation<INSTALLATION INSTRUCTIONS>## Quick Start / Usage<EXAMPLE OF USAGE>Any further information about the project should be located in a GitHub wiki.
Initiate the package manager
This guide will use npm to manage our package’s metadata:
npm initIf you have no idea how to answer the prompts you can leave everything as default, but you should have the information required for name, description, and author.
Note: IF YOU PLAN TO PUBLISH THE PACKAGE TO THE GITHUB REGISTRY YOU NEED TO PREFIX YOUR PACKAGE NAME WITH YOUR USERNAME!!! I.e.,
@spiltbeans/package-name
Installing packages
There are a couple of options for installing dependencies into the project:
Note: in this context “user” is the developer using your GCMDNP
| dependency type | dependencies | devDependencies | peerDependencies | bundleDependencies |
|---|---|---|---|---|
| dependency behaviour | will be downloaded in the user’s node_module folder. If the user already has a different version of the dependency installed, install the copy of the dependency in a node_module folder within your GCMDNP | will only be downloaded in your GCMDNP when in development and will be left behind when your package is installed by the user | will be downloaded in the user’s node_module folder. If the user already has the dependency but a different version, warn the user that they have a different version, but don’t enforce a new installation UNLESS the dependency has a major version difference (i.e., 1.x.x vs 2.x.x) | will be bundled with your GCMDNP and therefore automatically installed in the user’s project when installing your package |
Only JavaScript and type declarations will be shipped to the user when they install the package. Since none of the project configurations or even the TypeScript is sent to the user we should be mindful of how the dependencies are installed so that the user doesn’t download useless dependencies in their own project.
Refer to npm docs on how to use npm install flags to mark dependencies as dev, peer, bundle, etc.
File structure
My preferred structure looks like this:
[project]├── src│ ├── @types│ │ ├── index.ts│ ├── lib│ │ ├── main.ts│ ├── index.ts└── package.jsonThis structure is maintainable for my workflow because it separates the logic cleanly, which allows for code/type modularity where I can just create the files in lib or @types as needed.
Generate my preferred file structure by running the following command from the project root:
mkdir src src/@types src/lib && touch src/index.ts src/lib/main.ts src/@types/index.tsNote: the rest of this guide uses this file structure, but use what works for you!
Husky
Husky is a tool to manage and trigger Git Hooks, which basically do “some defined action” when there is a commit. This package will create some Git Hooks later.
-
Install Husky at the root of the project:
Terminal window npm i --save-dev huskyNote: the
--save-devflag (-Dflag for short) is used to install Husky asdevDependencies. -
Add a prepare script to the
package.json. When Husky installs itself into the./.huskydirectory it adds a.gitignorethat will ignore all of its installed files, so Husky needs to reinstall itself on every npm installation:package.json {"scripts": {// some scripts"prepare": "husky install" // prepare will automatically run before the npm i command}} -
Trigger the actual Husky install:
Terminal window npm i
Commit linting
To ensure that commit messages are consistent, this project will use commitlint and Husky to ensure Angular commit guidelines are being followed.
-
Install commitlint at the root of the project:
Terminal window npm i -D @commitlint/config-conventional @commitlint/cli -
Create a config file for commitlint with commit conventions:
Terminal window echo "module.exports = {extends: ['@commitlint/config-conventional']}" > commitlint.config.cjs -
Add a Husky hook to run commitlint on every commit message:
Terminal window echo "npx --no -- commitlint --edit $1" > .husky/commit-msg
Version control
Project versions are an important piece of metadata for npm packages. There are many options to manage your package version according to semantic versioning. I recommend using release-please by Google or Changesets.
Some differences to consider:
release-please | changesets | |
|---|---|---|
| version bumps | release-please will only bump a version if your commit is a BREAKING CHANGE, feat, or fix | You manually bump the version using a changesets command |
| changelogs | release-please auto-generates a CHANGELOG file based on your commit messages | You manually write the contents of the CHANGELOG file using a changesets command |
| bumping the repo | release-please bumps your repo via an automated pull request | You manually bump your repo with a commit. You can set up your own GitHub Action to have an automated pull requests |
Some developers believe changesets are more flexible. I’ll show both and you can choose what suits you best.
Changesets
-
Install changesets at the root of the project:
Terminal window npm i -D @changesets/cli && npx changeset init -
Bump the version with the following command:
Terminal window npx changesetNote: when you follow the cli instructions you will find an auto-generated file in the
./changeset/<some-random-human-readable-changeset-name>.md. -
Apply version bump
Manual
-
Use the following command:
Terminal window npx changeset version -
Commit the modified CHANGELOG.md and package.json
Automated
- Set up a GitHub Action that will automatically create a pull request to bump our versions. Changesets’ documentation has a great tutorial.
-
Note: you must also allow GitHub Actions to read, write, and create pull requests in your GitHub repo settings:
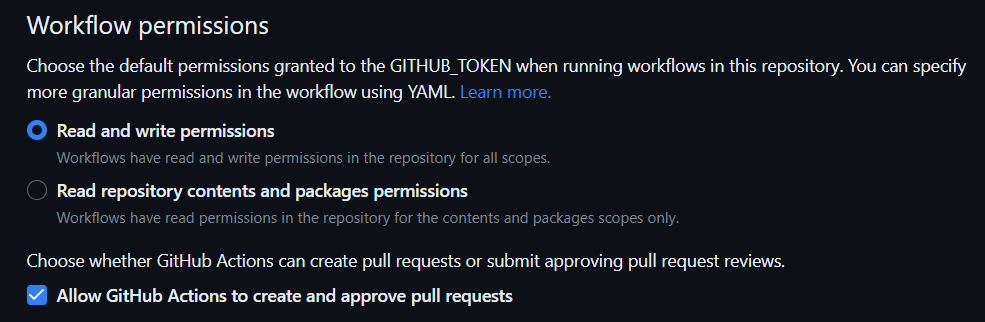
Note: Changesets flatten version bumps of the same type!. Ensure you merge the pull request or manually bump the package version often if you want to have granular bumps rather than the flattening effect.
release-please
- Create a Personal Access Token (PAT) with the following permissions:
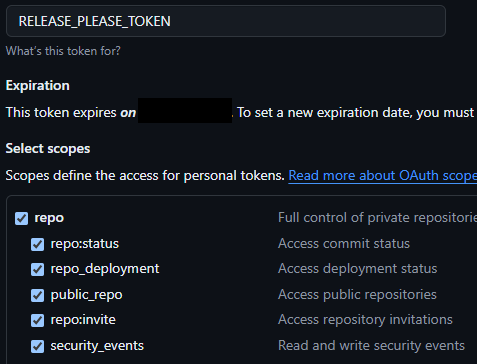
-
Add your PAT to your GCMDNP repo as an Action Secret
-
Add a GitHub Action to your project
Terminal window mkdir .github .github/workflows && touch .github/workflows/release-please.yml -
Configure the GitHub Action as follows:
.github/workflows/release-please.yml on:push:branches:- mainpermissions:contents: writepull-requests: writename: release-pleasejobs:release-please:runs-on: ubuntu-lateststeps:- uses: googleapis/release-please-action@v4with:# this assumes that you have created a personal access token# (PAT) and configured it as a GitHub action secret named# `RELEASE_PLEASE_TOKEN` (this secret name is not important).token: ${{ secrets.RELEASE_PLEASE_TOKEN }}# this is a built-in strategy in release-please, see "Action Inputs"# for more optionsrelease-type: node -
Merge release-please pull requests to apply version bumps to the repository
Note: you must also allow GitHub Actions to read, write, and create pull requests in your GitHub repo settings:
Note: release-please flattens version bumps of the same type!. Ensure you merge the pull request often if you want to have granular bumps rather than the flattening effect.
Linting
Prettier
Prettier is a package that formats the code. It’s not used for type checking or finding code errors. Use ESLint and/or TypeScript.
Prettier can enforce rules such as having your code use tabs, placing semi-colons on each line, etc.
-
Install Prettier at the root of the project:
Terminal window npm i -D prettier -
Create a config file for Prettier:
Terminal window echo {} > .prettierrc -
(optional) You can use a Prettier plugin to organize import statements:
Terminal window npm i -D @trivago/prettier-plugin-sort-imports -
There are many options for customizing Prettier to make code clear for you! An example config I like:
.prettierrc 1{2"trailingComma": "es5",3"tabWidth": 4,4"semi": false,5"singleQuote": false,6"singleAttributePerLine": false,78// optional import plugin config9"importOrder": [10"^@core/(.*)$",11"^@server/(.*)$",12"^@ui/(.*)$",13"^[./]"14],15"importOrderSeparation": true,16"importOrderSortSpecifiers": true,17"importOrderCaseInsensitive": false,18"plugins": [19"@trivago/prettier-plugin-sort-imports"20]21} -
Add format scripts to the
package.jsonto run Prettier on the project files:package.json {// some config"scripts": {// some scripts"format:check": "prettier --check src --cache", // checks files"format:write": "prettier --write src --cache" // applies fixes}}Note: the
--cacheflag will apply the scripts to changed files only. Remove the flag if you want the script to apply to the entire project.
ESLint
ESLint is a package that lints the code. It is used for finding code errors!
ESLint can enforce rules that ensure the code runs without a runtime, syntax, or logic error, such as whether to use === or == equality.
-
Install ESLint by running the following command at the root of the project:
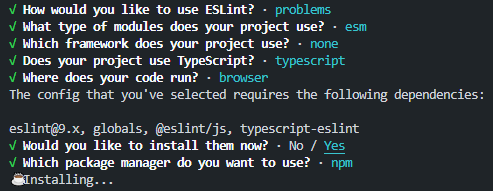
Terminal window npm init @eslint/configConfigure ESLint with what works best for your project, but my recommended prompts are as follows:
-
Add the following override to your
package.jsonto ensure that ESLint plugins are forced to use the version of ESLint you’ve installed rather than the version the plugin depends on.Note: overrides are useful if plugin maintainers don’t update their dependencies. This step is recommended by ESLint.
package.json {// some config"overrides": {"eslint": "^9.6.0" // or whichever ESLint you've installed}}The CLI generates almost everything we’re going to need. If you selected the “Does your project use TypeScript” option you’ll find the typescript-eslint package already configured, which lets ESLint and Prettier be compatible with TypeScript. Nice!
ESLint can be used as a formatter, but that should really be left to a dedicated formatter like Prettier.
-
To disable rules that conflict with Prettier, we can use the eslint-config-prettier package:
Terminal window npm i -D eslint-config-prettier -
Import
eslint-config-prettierand add it to the end of the ESLint configuration array:eslint.config.mjs 1import eslintConfigPrettier from "eslint-config-prettier"23export default [4// some plugins5eslintConfigPrettier6] -
Add a lint script to the
package.jsonto run ESLint on our files:package.json {// some config"scripts": {// some scripts"lint:eslint": "eslint src/**/** --config eslint.config.mjs"}}
There are many options for customizing ESLint if you’re adventurous, but the default rules are suitable for this guide.
TypeScript
“TypeScript is just overhead!”
You shouldn’t feel obligated to write your code in TypeScript, but it’s widely adopted and not that much work to get running.
Despite what the TypeScript haters say, we should consider the developer experience and “how easy it is for someone to use my work.” If type declarations help developers use your package - then use it.
A rising alternative to TypeScript is to use JSDoc which essentially uses code comments to enforce type safety, which eliminates the transpile step in building a package since the source code is also JavaScript. For more information comparing the pros and cons of JSDoc to TypeScript I recommend reading Nwalozie Elijah’s article at OpenReplay, “JSDoc: A Solid Alternative To TypeScript”.
If you aren’t familiar with TypeScript AT ALL, fear not! You can always ditch the type system and author your *.ts files in JavaScript and the transpiler will still emit types using type inference.
Ok ok, fine just use
*.jsfiles. Whatever. I’m still using.ts.
“But we already have ESLint??!”
ESLint should be linting your code for code correctness, like enforcing the appropriate equality checks (=== vs ==), enforcing unused variables, etc. TypeScript is used for defining the shape of objects, other variables, and functions within the code to be able to properly handle data and avoid runtime errors.3
-
Install TypeScript and Node.js types at the root of the project:
Terminal window npm i -D typescript @types/node -
There are fr fr many options for the TypeScript config an example that suits this project can be generated with the following command:
Terminal window npx tsc --init --forceConsistentCasingInFileNames --skipLibCheck --verbatimModuleSyntax --allowJs --resolveJsonModule --moduleDetection force --strict --noUncheckedIndexedAccess --lib ESNext --moduleResolution Bundler --isolatedModules --target es2022 --declaration false --esModuleInterop --module ESNextYou can clean up the comments by hand, or you can be a programmer (source):
Terminal window sed -i -r '/^[ \t]*\//d; /^[[:space:]]*$/d; s/\/\*(.*?)\*\///g; s/[[:blank:]]+$//' tsconfig.jsonThe
tsconfig.jsonshould now contain the following configuration:tsconfig.json {"compilerOptions": {"target": "es2022","lib": ["esnext"],"moduleDetection": "force","module": "esnext","moduleResolution": "bundler","resolveJsonModule": true,"allowJs": true,"declaration": false,"isolatedModules": true,"verbatimModuleSyntax": true,"esModuleInterop": true,"forceConsistentCasingInFileNames": true,"strict": true,"noUncheckedIndexedAccess": true,"skipLibCheck": true}} -
Add the source directory to the config to tell TypeScript where to do the type checking:
tsconfig.json {"compilerOptions": {// some compiler options},"include": ["src/**/*"]} -
Add a lint script to the
package.jsonto run TypeScript on the project files:package.json {// some config"scripts": {// some scripts"lint:ts": "tsc --noEmit --pretty",}}
Configuring you your tsconfig.json is the “choose your own adventure” part of this guide. TypeScript configurations are different for most projects. (i.e., is your package only exporting JavaScript? Is your package exporting jsx? Are you mixing JavaScript and TypeScript? Are you referencing your modules with or without file extensions? etc.).
Let’s walk through why I made these decisions for my tsconfig.json file:
Things that affect the linting
lib: the JavaScript library used for the type-checking (ECMA version, DOM, etc.).- I want to develop with the latest JavaScript library available. We won’t have to worry about user support for
esnextsincelibversion doesn’t get emitted.
- I want to develop with the latest JavaScript library available. We won’t have to worry about user support for
allowJs: let JavaScript interop work in TypeScript files.- I may want to use JavaScript in this package.
forceConsistentCasingInFileNames: enforces case-sensitive file names based on how other files are named.- Personal preference to have this. I prefer consistent file name casing in my project.
strict: enforces the main type checking benefits of TypeScript.- Some say that if you disable
strictyou might as well not use TypeScript.
- Some say that if you disable
noUncheckedIndexedAccess: will throw warnings when indexing an array/object such as “index may beundefined”.- This option is useful, especially concerning input you don’t control (i.e., Promises, user input, etc.) where you should consider handling
undefinedorindex does not existresponses.
- This option is useful, especially concerning input you don’t control (i.e., Promises, user input, etc.) where you should consider handling
skipLibCheck: will not check over the TypeScript declaration files in your project.- You shouldn’t be creating declaration files in your project, so this is mainly going to skip over the declaration files in your
node_moduledependencies. I don’t want to check over dependency types which are likely already type-checked.
- You shouldn’t be creating declaration files in your project, so this is mainly going to skip over the declaration files in your
moduleDetection: will tell TypeScript that all of your files are modules (ESM or CJS) with their own scope, as opposed to scripts that declare variables in the global scope.forcewill tell TypeScript to assume your files are modules rather thanautowhich checks each file’s import/export statement and thetypevalue in thepackage.jsonto determine if the file is CommonJS or ES Module.
moduleResolution: will tell TypeScript how to find the file for an imported module.bundlerhas the characteristics of:importcondition (from ES Module syntax).- does not require file extension (from CommonJS syntax).
- performs directory module resolution. I.e., I can import
./somethingand the runtime will look for./something/index.tsbecauseindexis a special filename. (from CommonJS syntax).
- Because we will be emitting CommonJS and ES Module I want the source code to have non-strictly defined imports and have the bundler figure out module paths with file types.
resolveJsonModule: let JSON interop just work in TypeScript files.- I may want to use JSON in this package.
isolatedModules: Typescript will check whether individual files rely on other files to transpile. E.g.,module arelies on something in the global type system (i.e., enum, namespace, etc.). This is because the types affect how the code is transpiled in some circumstances and often bundlers will transpile one file at a time and therefore won’t be able to access the full type system.- This should be enabled as this project uses a bundler.
verbatimModuleSyntax: does two things- (1) TypeScript will not emit
module bifmodule aonly imports a type frommodule band no other code. - (2) TypeScript does not allow you to mix and match import/export styles between the source code you write and the emitted code. I.e., if you’re writing an ES Module and emitting as CommonJS, you cannot use ES Module syntax for importing.
- TypeScript usually does magic to let mix-and-match import/exports work but it’s become less common to let that magic happen in modern projects.
- (1) TypeScript will not emit
Things that affect the compiled JavaScript
target: the JavaScript version to be emitted by the transpileres2022is a widely supported ECMAScript edition (ES13) by runtimes, so it’s unlikely this project will use features that will be unsupported or require polyfills.
module: whether TypeScript emits your modules as CommonJS or ES Modules.- Because we are using a bundler and our
moduleResolutionisbundlerwe must select anes*module type. This is not a big deal since our bundler will emit the correct module import/export statements.
- Because we are using a bundler and our
declaration: tells TypeScript to emit type declaration files.- We want to disable this because we’ll be emitting declarations via a separate command, not through config. (discussed later)
esModuleInterop: will TypeScript emit some extra JavaScript to make sure that if you’re using CommonJS/AMD/UMD modules as if they’re ESM, it will still work by whatever uses your transpiled code.- If this is disabled you might occasionally have errors because ESM and CJS handle default import/exports differently (
require("").defaultmoment).
- If this is disabled you might occasionally have errors because ESM and CJS handle default import/exports differently (
I want to note at this point that many blogs, tutorials and other accessible mediums to find information on TypeScript compiler options do a poor job of explaining what the options do. Even the TypeScript TSConfig Reference documentation is confusing at times. If you are confused about TSConfig compiler options, my recommendation is to look at the source material.
For example, below are three references I used to fully understand what verbatimModuleSyntax does, including the actual TypeScript pull request and proposal. Sometimes the source is just good:
- “Announcing TypeScript 5.0” by Daniel Rosenwasser (Microsoft)
- “Proposal: deprecate
importsNotUsedAsValuesandpreserveValueImportsin favor of single flag” by Andrew Branch - “Add
verbatimModuleSyntax, deprecateimportsNotUsedAsValuesandpreserveValueImports” by Andrew Branch
Lint-staged
We can use lint-staged to make sure our linters run on each commit.
-
Install lint-staged at the root of the project:
Terminal window npm i -D lint-staged -
Create a config file for lint-staged:
Terminal window echo {} > .lintstagedrc -
Add the npm linting commands to the config instructions which will run on
*.tsfiles. So far this guide has the following:.lintstagedrc 1{2"*.ts": [3"npm run format:write",4"npm run lint:eslint",5"npm run lint:ts"6]7} -
Add a hook to Husky to run lint-staged on before every commit:
Terminal window echo "npx lint-staged" > .husky/pre-commit
Maintain project dependencies
Instead of manually updating our project dependencies, we can automate this process by adding a GitHub bot to our project.
Renovate
Note: Renovate has a tutorial with pictures here
-
Install the Renovate bot through the GitHub Marketplace: https://github.com/apps/renovate
-
Complete the registration with Mend.
-
Complete the organization registration.
- Select interactive mode to ensure the Renovate bot sends upgrade pull requests.
- Use the “With Config File” option to ensure the bot is only active on repositories that you select.
-
Create a config file for renovate:
Terminal window echo {} > renovate.json -
There are many options for customizing Renovate. The default is fine in most instances:
renovate.json {"$schema": "https://docs.renovatebot.com/renovate-schema.json","extends": ["config:base"]}
Now we will receive automated emails and pull requests when dependencies in our project can be updated.
You can find additional configuration options on the RenovateBot website
Testing
Jest
Jest is a package that lets us create test harnesses to test the correctness of our code.
-
Install Jest, Jest types, and a TypeScript-Jest transformer to use TypeScript with Jest at the root of the project:
Terminal window npm i -D jest @types/jest ts-jest @jest/globals -
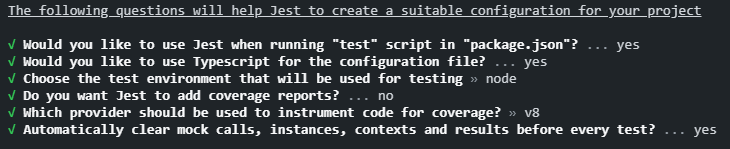
Generate the Jest config by by running the following command at the root of the project, and following the prompts for how you want to customize your environment:
Terminal window npx jest --initMy initiating recommendations:
-
Change the default export in the Jest config file because this project uses
verbatimModuleSyntax:jest.config.ts 1// some code23export default config45module.exports = configGenerating a Jest config through the CLI generates almost everything we’ll need! We need to configure the Jest to use the
ts-jestpackage so that Jest can work on our*.tscode. -
Change the jest config type to use the ts-jest compliant config:
jest.config.ts 1import type { JestConfigWithTsJest } from 'ts-jest'23const config: JestConfigWithTsJest = {4// some config5}67module.exports = config -
Jest still considers ES Modules an experimental feature. To enable interop we have to manually enable
useESM:jest.config.ts 1import type { JestConfigWithTsJest } from 'ts-jest'23const config: JestConfigWithTsJest = {4// some config5extensionsToTreatAsEsm: ['.ts'],6transform: {7'^.+\\.[tj]sx?$': [ //to process ts,js,tsx,jsx with `ts-jest`8'ts-jest',9{10useESM: true,11},12],13},14}15module.exports = config -
Configure jest to skip
@typeswhen it reports which files have tests:jest.config.ts 1import type { JestConfigWithTsJest } from 'ts-jest'23const config: JestConfigWithTsJest = {4// some config5coveragePathIgnorePatterns: [6"src/@types"7],8}9module.exports = config -
Change or add the test script in the
package.jsonpackage.json {// some config"scripts": {// some scripts"test": "node --experimental-vm-modules --no-warnings node_modules/jest/bin/jest.js","test:coverage": "node --experimental-vm-modules --no-warnings node_modules/jest/bin/jest.js --coverage --coverageDirectory=./test/coverage","test:ci": "node --experimental-vm-modules --no-warnings node_modules/jest/bin/jest.js --ci",},}Note: the
--experimental-vm-modulesflag to enable ES Modules in thenode:apithat jest accesses.test:coverage: will produce an html document in./tests/coveragethat shows you which files/functions have tests.test:ci: will not store snapshots when tests fail.
While we’re in the
package.jsonadd the following line to indicate to the runtime that our project should be consumed as an ES Module (I’ll repeat this step later as a reminder):package.json {// some config"type": "module","scripts": {// some scripts},} -
Add jest coverage to
.gitignoreTerminal window printf "\ntest/coverage" >> .gitignore -
Create a GitHub workflow to run your tests and linting as a GitHub action
Terminal window mkdir .github .github/workflows && touch .github/workflows/ci.ymlNote: actions are great to use because it will prohibit code from entering your codebase if it doesn’t pass linting/test
-
Configure the GitHub Action as follows:
.github/workflows/ci.yml name: continuous-integrationon:pull_request:branches: [main]push:branches: [main]jobs:test:runs-on: ubuntu-lateststeps:- name: Checkoutuses: actions/checkout@v2- name: Use Node.jsuses: actions/setup-node@v4with:node-version: "18.x"- name: Install Dependenciesrun: npm ci- name: Run TSCrun: npm run lint:ts- name: Run ESLintrun: npm run lint:eslint- name: Run Prettierrun: npm run format:check- name: Run Testsrun: npm run test:ci- name: Test Successful Buildrun: npm run build
Nice! We’ll write some tests later.
Note: jest will not work without our next step: setting up
ts-node
Runtime
ts-node and nodemon
nodemon is a package that will run our code on our machine and restart its instance whenever a change is made to the files. Pretty handy! But nodemon was only made to run JavaScript, so we’ll also need to use ts-node to have nodemon work with our code.
-
Install
ts-nodeandnodemonat the root of the project:Terminal window npm i -D ts-node nodemon tslibNote: tslib is a TypeScript library that contains helper functions that ts-node (and Rollup plugins) depend on.
If our code was using CommonJS we’d be able to slap a
nodemon src/index.tsscript in ourpackage.jsonand call it a day. Unfortunately we have to do a few more steps: -
Add the following configuration to the
tsconfig.json:tsconfig.json {"compilerOptions": {// some compiler options},"ts-node": {"esm": true,"experimentalSpecifierResolution": "node",}}Note:
esmrequires a file type in its import statements. We usemoduleResolutionasbundlerin ourtsconfig.jsonso that we don’t use file types, and the bundler can deal with it. In order for this to work withts-nodewe needexperimentalSpecifierResolutionset tonodeso thatts-nodedoesn’t complain that our imports don’t have file types when it executes the code on our machine. -
Add the following configuration to the
package.jsonpackage.json {// some config"nodemonConfig": {"exec": "node --no-warnings --loader ts-node/esm src/index.ts","watch": ["src"],"ext": "ts,json,js"}}Note: Since ES Modules are also experimental for
ts-nodewe need to loadts-node/esmwhen our files are executed. This means we unfortunately can’t just runnodemon src/index.tswith its out-of-the-box settings, we need to configurenodemonrun a specific command with our loaded module. -
Add a start to the
package.jsonpackage.json {// some config"type": "module","scripts": {// some scripts"start": "nodemon"},}
Example npm package code

Follow along with my npm starter-kit repo.
Note: see pull requests and issues for more details on my workflow.
Example Code
This package will be simple:
Types
1export type TMessage = string1export * from "./main/main"Source
1import type { TMessage } from "../@types"2
3export const important_message: TMessage = "hello"4export const world = () => console.log(important_message)1export const hello_world = () => console.log("Hello, World")1export * from './@types'2
3export * from "./lib/main"4export * from "./lib/hello"Example Tests
1import { jest } from "@jest/globals"2
3import { world } from "../src/index"4
5describe("testing world function", () => {6    it("console should say hello", () => {7        const consoleSpy = jest.spyOn(console, "log")8        world()9        expect(consoleSpy).toHaveBeenCalledWith("hello")10    })11})
Building the npm package
Mental model
There are four steps to build the package:
- Emit type declaration files for all of our source code and types
- Transpile the source code to CommonJS
- Transpile the source code to ES Modules
- Generate a file of bundled TypeScript declarations for both ES Module and CommonJS
The package will be shipped to the user in JavaScript. We will also ship .d.ts type declaration files to allow users to develop in TypeScript to understand the type and shape of the package code.
Why the build is not emitting source maps
Source maps are really for minified code that is mostly not human-readable. The purpose is so that developers can inspect modules (in the browser for example) and be directed to the (pre-minified human-readable) source code rather than the minified code, even if the minified code is being used rather than the source code.
We aren’t minifying code in this package, so we won’t need to direct users to a different human-readable source code using source maps; all of our source code should be human-readable!
Why the build is not minifying
The purpose of minifying code is to make the files smaller while keeping functionality. The process may look like:
1// example source code (pre-minified)2const someDescriptiveVariable = "hello"3
4
5// example minified code6const s="hello"
This illustration is not a 1-to-1 on how the minification algorithm works, but the essence is that we removed a significant amount of characters that matter to the human but will be useless bytes for the runtime.
If you were, for example, shipping code that is intended to be used right in a production environment (i.e., used in the browser, or used in a project that is not bundled) then it would make sense to minify your code and save precious space in your files. In our case, users will likely consume our module in a development environment with some bundler.
Why aren’t we bundling our code into a single JavaScript file
A common pattern when creating a npm package is to emit your bundle as a single JavaScript file. Although some say you should bundle your code into a single JavaScript file simply “for cleanliness” , this has multiple problems:
- Less effective static analysis for tree shaking.
- Cannot dynamic import.
“If we are emitting our code as modules in separate files, why do we emit a single .d.ts type declaration file?”
Because declaration files are global scoped, it doesn’t matter to the linter whether you use one file or many. We will opt for a single type declaration file that is easy to read and consume as a developer.
Another reason is to avoid breaking encapsulation which is essentially a scenario where types are bundled in the wrong declaration files.
I describe why we need to emit a single type declaration file for both our CJS and ESM builds later.
Note: we won’t face the same issues of “well now we can’t dynamically import” because you don’t dynamically import types.
Package config
These configurations will be read by the user’s runtime when they consume our package.
-
In order to have our package work for both ESM and CommonJS JavaScript, we will write a
conditional exportproperty in ourpackage.jsonaccording to the TypeScript specification.package.json {// some config"exports": {".": {"import": {"types": "./dist/@types/esm/index.d.ts","default": "./dist/esm/index.mjs"},"require": {"types": "./dist/@types/cjs/index.d.cts","default": "./dist/cjs/index.cjs"}},"./*": {"import": {"types": "./dist/@types/esm/index.d.ts","default": "./dist/esm/index.mjs"},"require": {"types": "./dist/@types/cjs/index.d.cts","default": "./dist/cjs/index.cjs"}}},"types": "./dist/@types/index.d.ts","module": "./dist/esm/index.mjs","main": "./dist/cjs/index.cjs",}Note: these settings were at one point suggested by TypeScript documentation. Based on the current TypeScript documentation it is unclear if this is still suggested. See my full explanation here
What these settings mean:
exports: takes highest precedent in modern node and conditionally switches between CommonJS and ES Module source depending on how the user imports the package.main: used as a fallback for old node versions looking for CommonJS that don’t supportexportsconfigurationmodule: used as a fallback to when build tools usedmoduleto resolve where the ES Modules were.exports.".": the catch-all condition for when users import the package (i.e.,from 'npm-package')exports."./*": used when users selectively import modules in import patterns like such as:
1const { hello_world } = require("npm-package-template/lib/hello")Note: subpath entry points are useful for dynamic imports/lazy-loading/code-splitting
-
(skip if completed in jest setup) Add a
typeproperty to thepackage.jsonto declare the module type of the project (ES Module):package.json {// some config"type": "module",} -
Add a
filesproperty to thepackage.jsonto determine which files will be shipped to the user:package.json {// some config"files": ["dist/**/*","README.md""!dist/declarations/*"],} -
Add prepack and clean scripts to the
package.jsonpackage.json {// some config"scripts": {// some scripts"build:clean": "rm -rf dist","prepack": "npm ci && npm run build"},}npm will use the
packcommand to ship our project, so we can take advantage of npm’s specialpre*syntax to run scripts beforepackruns.Note:
npm cicreates a fresh install of our dependencies as opposed tonpm iwhich will only install dependencies that aren’t currently installed.
Declarations with TSC
Our setup so far means we only need to add a single command to emit our declarations:
{ // some config "scripts": { // some scripts "build:declarations": "tsc --declaration --emitDeclarationOnly --outDir ./dist/declarations" },}Bundling with Rollup.js
To use Rollup on a TypeScript project we’ll need to use the typescript plugin and the tslib library (already installed when installing ts-node!).
We’ll use the rollup-plugin-dts plugin to bundle our declaration files.
Note: if you package includes third-party modules in
node_moduleI recommend using the @rollup/plugin-node-resolve plugin. If your package includes CommonJS modules I recommend using the @rollup/plugin-commonjs plugin.
-
Install Rollup and Rollup plugins at the project root:
Terminal window npm i -D rollup rollup-plugin-dts @rollup/plugin-typescript -
Create a config file for Rollup
Terminal window touch rollup.config.js -
There are many options for customizing Rollup but an example for this guide would be:
rollup.config.js 1import typescript from "@rollup/plugin-typescript"2import { dts } from "rollup-plugin-dts"34import package_details from "./package.json"56const outputConfig = {7dir: "dist/esm",8format: "es",9exports: "named",10generatedCode: {11constBindings: true,12},13preserveModules: true,14entryFileNames: "[name].mjs",15}16export default [17// build the CommonJS Module code18{19input: "src/index.ts",20output: [21{22...outputConfig,23dir: "dist/cjs",24format: "cjs",25entryFileNames: "[name].cjs",26},27],28plugins: [29typescript({30compilerOptions: { declaration: false, outDir: "dist/cjs" },31}),32],33},34// build the ESModule code35{36input: "src/index.ts",37output: [38{39...outputConfig,40},41],42plugins: [43typescript({44compilerOptions: { declaration: false, outDir: "dist/esm" },45}),46],47},48// this config will bundle the type declaration files49// emitted during the `build:declarations` step for the `types` fallback50{51input: "./dist/declarations/index.d.ts",52output: [{ file: package_details.types, format: "es" }],53plugins: [dts()],54},55// this config will bundle the type declaration files56// emitted during the `build:declarations` step for the ES Module types57{58input: "./dist/declarations/index.d.ts",59output: [60{ file: package_details.exports["."].import.types, format: "es" },61],62plugins: [dts()],63},64// this config will bundle the type declaration files65// emitted during the `build:declarations` step for the CommonJS types66{67input: "./dist/declarations/index.d.ts",68output: [69{ file: package_details.exports["."].require.types, format: "es" },70],71plugins: [dts()],72},73] -
Add a build script to the
package.jsonto transpile the TypeScript into ES Module JavaScript, CommonJS JavaScript, and a bundled type declaration file:package.json {// some config"scripts": {// some scripts"prebuild": "npm run build:clean && npm run build:declarations","build": "rollup --bundleConfigAsCjs -c rollup.config.js"},}Note: I use the
--bundleConfigAsCjsflag because the runtime can get confused about whether this config is CommonJS or ES Module.
“Why are we emitting our types twice?”
“Attempting to use a single
.d.tsfile to type both an ES module entry point and a CommonJS entry point will cause TypeScript to think only one of those entry points exists, causing compiler errors for users of the package.” - TypeScript 4.7 release notes
See my GitHub issue explaining why its unclear if this is true.
Making a demo
Let’s make a demo to observe the behaviour of our package before we publish our code.
-
From the project root you can run this command to generate a file structure for project demos:
Terminal window mkdir demos demos/ts demos/cjs demos/esm && touch demos/ts/index.ts demos/cjs/index.cjs demos/esm/index.mjsthe file structure should look like:
Terminal window [project]└── demos├── cjs│ ├── index.cjs├── esm│ ├── index.mjs└── ts└── index.ts -
cdinto a demo (example cjs) and initiate the demo by creating apackage.jsonby running the command:package-name/demos/cjs npm init -
Add scripts to the
package.jsonto build our package and to move the build to the demo folder:package-name/demos/cjs/package.json {"scripts": {"clean": "rm -rf ./cjs-demo_pkg.tgz node_modules package-lock.json","pack:build": "cd ../../ && npm pack && mv *.tgz ./demos/cjs/cjs-demo_pkg.tgz","pack:install": "npm i cjs-demo_pkg.tgz","pack:package": "npm run pack:build && npm run pack:install","prestart": "npm run clean && npm run pack:package","start": "node index.cjs","start:noinstall": "node index.cjs"},}
You can then test your package and see how it would behave in a user’s environment with the command npm run pack:package or npm start.
Note: we’re implicitly describing the demo’s module type with file extensions (
*.mjs/*.cjs), but*.tscan work with both module systems, so you need to have atypeproperty ofmodulein your demo’spackage.jsonto explicitly define the module type. See demo examples here
You can additionally check if your package correctly supports CommonJS and ES Modules by uploading the .tgz file that’s created after npm run pack:package into Are The Types Wrong.
Publish the package

It’s common to publish a npm package using the CLI or using GitHub Actions.
The most popular package registries to publish to are the npm registry or the GitHub registry.
The following instructions will run tests and publish the npm package to the GitHub registry when a release has been made for the package.
Note: release-please will automatically create a release when the version bump pull request is merged.
name: Node.js Package
on:  release:    types: [created]
jobs:  build:    runs-on: ubuntu-latest    steps:      - uses: actions/checkout@v4      - uses: actions/setup-node@v3        with:          node-version: 18      - run: npm ci      - run: npm test
  publish-gpr:    needs: build    runs-on: ubuntu-latest    permissions:      contents: read      packages: write    steps:      - uses: actions/checkout@v4      - uses: actions/setup-node@v3        with:          node-version: 18          registry-url: https://npm.pkg.github.com/      - run: npm ci      - run: npm publish        env:          NODE_AUTH_TOKEN: ${{secrets.GITHUB_TOKEN}}
There are no additional steps because the GITHUB_TOKEN is automatically supplied by your repository.
GitHub provides a guide on publishing to the npm registry, but essentially you replace registry-url with https://registry.npmjs.org/, create an npm access token, and add the access token to your GitHub repository secrets.
Note: users installing your package published to the GitHub registry will need to do additional steps by setting up a
.npmrcfile. I recommend publishing to the npm registry if you don’t want your users going through these extra steps.
Once you’ve made a release and published your package, you can check that your package correctly supports CommonJS and ES Modules by using Are The Types Wrong.
Thanks for reading
Keeping in mind your package requires a unique setup, I think this guide provides a detailed jumping-off point that I see as becoming exceedingly necessary4 for some developers today.
My npm starter-kit repo: https://github.com/spiltbeans/npm-package-starter-kit.
Enjoy my work? Subscribe and get notified when I write more things!
References
- Tree Shaking References5
- npm Dependencies References6
- TypeScript References7
- Jest References8
- Why Not To Bundle Your Package References9
- Package Configuration References10
- Hybrid npm Packages (ESM and CJS) References11
Footnotes
-
Interop issues with exporting as default
- https://github.com/rollup/plugins/issues/635
- https://github.com/Swatinem/rollup-plugin-dts/pull/274
- “How to Create a Hybrid NPM Module for ESM and CommonJS” by SenseDeep, see section “Single Source Base”
-
A series of articles describing why exporting as default is a horrible design pattern
- “
export default thingis different toexport { thing as default }” by Jake Archibald - “Avoid Export Default” by Basarat Ali Syed
- “Default Exports in JavaScript Modules Are Terrible” by Lloyd Atkinson
- “Why we have banned default exports in Javascript and you should do the same” by Kris Kaczor
- “
-
“What are ESLint and TypeScript, and how do they compare?” by typescript-eslint.io ↩
-
Examples of why developers today need detailed guides on “how to build npm packages”
- https://twitter.com/oleg008/status/1510006191296061441
- “How to make your own npm package with typescript” by Colin Diesh; re: “There is a lot of mystery around making your own npm package”
- “Apple Front End Interview Questions” by Front End Interview Handbook; re: “How do you build an npm package” question
-
Tree Shaking References
↩ -
npm Dependencies References
- “NPM: Dependencies vs Peer Dependencies” by Tapaswi
- “Specifics of npm’s package.json handling” by npmjs
- “The npm Dependency Handbook for You” by Tapas Adhikary
-
TypeScript References
↩ -
Jest References
↩ -
Why Not To Bundle Your Package References
- https://cmdcolin.github.io/posts/2022-05-27-youmaynotneedabundler
- https://stackoverflow.com/questions/36846378/what-is-the-pros-cons-of-compiling-typescript-into-single-js-file?rq=4
-
Package Configuration References
- https://www.cs.unb.ca/~bremner/teaching/cs2613/books/nodejs-api/packages/
- https://nodejs.org/api/packages.html#main-entry-point-export
-
Hybrid npm Packages (ESM and CJS) References
- “Hybrid npm packages (ESM and CommonJS)” by Dr. Axel Rauschmayer
- “How to Create a Hybrid NPM Module for ESM and CommonJS” by SenseDeep
- “Best practices for creating a modern npm package with security in mind” by Brian Clark